DIY Swimming Pool Fiberglass Step Repair Made Simple
Identifying Fiberglass Pool Step Damage and Causes
To perform a permanent swimming pool fiberglass step repair, lower the pool water 6 to 12 inches below the damaged area, stabilize any hollow voids underneath with high-density expanding closed-cell foam, bevel and sand the crack edges, laminate layered chopped strand fiberglass mat with marine epoxy resin, and seal the repair with color-matched gelcoat blended with non-slip grit.
Understanding what caused your step damage ensures your fix withstands severe winter freeze-thaw cycles across Southeast Wisconsin, including Waukesha County, the Milwaukee metropolitan area, and Walworth County.
Here are the primary types of damage you will encounter:
- Stress Cracks and Hairline Fractures: Thin, web-like surface cracks (often called spiderwebbing) that appear in the gelcoat. They are typically cosmetic initially, but water infiltration over winter can freeze, expand, and force them into full-thickness structural fractures.
- Structural Leaks and Splits: Visible cracks running across a tread or riser that extend through the fiberglass laminate. These cause active water loss and allow pool water to erode the backfill beneath the structure.
- Osmotic Blisters: Raised bubbles or bumps on the gelcoat surface. These occur when water vapor permeates the top layer and reacts with underlying chemicals, creating acidic fluid pockets under osmotic pressure.
- Delamination: A separation between the structural fiberglass layers and the decorative gelcoat. The surface may feel soft, spongy, or flaky to the touch.
- Hollow Voids: The loss of the compacted sand or gravel base beneath the stair tread. When you step on the tread, it flexes downward noticeably.
Regular fiberglass pool maintenance helps catch these issues before winter temperatures worsen them.
Diagnosing Structural Voids vs Surface Cracks
Before applying resin or patch kits, you must determine whether the damage is purely surface-level or caused by a lack of underlying support. If a step flexes because the sand base has washed away, putting epoxy over the crack is like putting a band-aid over a broken bone—the moment someone steps on it, the patch will crack again.
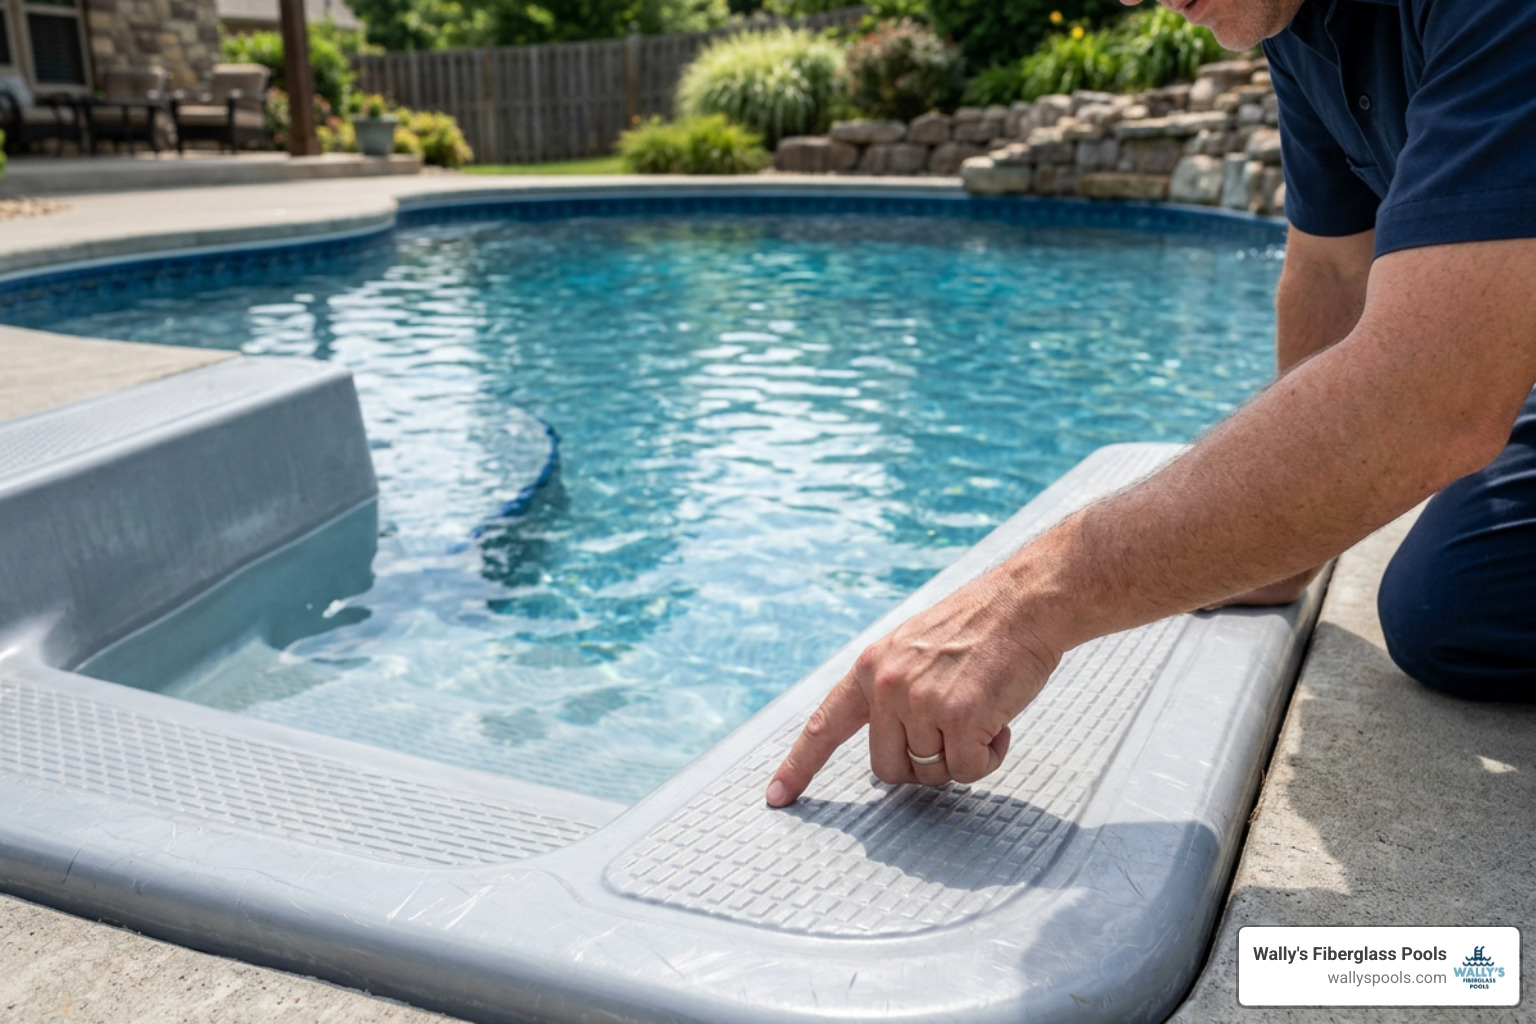
Use the Tap Test to check for voids:
- Take a hard, blunt plastic tool (such as the back handle of a heavy plastic screwdriver).
- Lightly tap across the entire tread and riser, moving in a grid pattern.
- Listen carefully to the tone. A solid, well-supported step produces a sharp, high-pitched “click” or “knock.”
- A void or delaminated area produces a dull, hollow “thud.”
- Use a grease pencil or chalk to outline the perimeter of any hollow zones directly on the step surface.
If you find a hollow void, you must inject structural support before patching the surface.
Step-by-Step Swimming Pool Fiberglass Step Repair Process
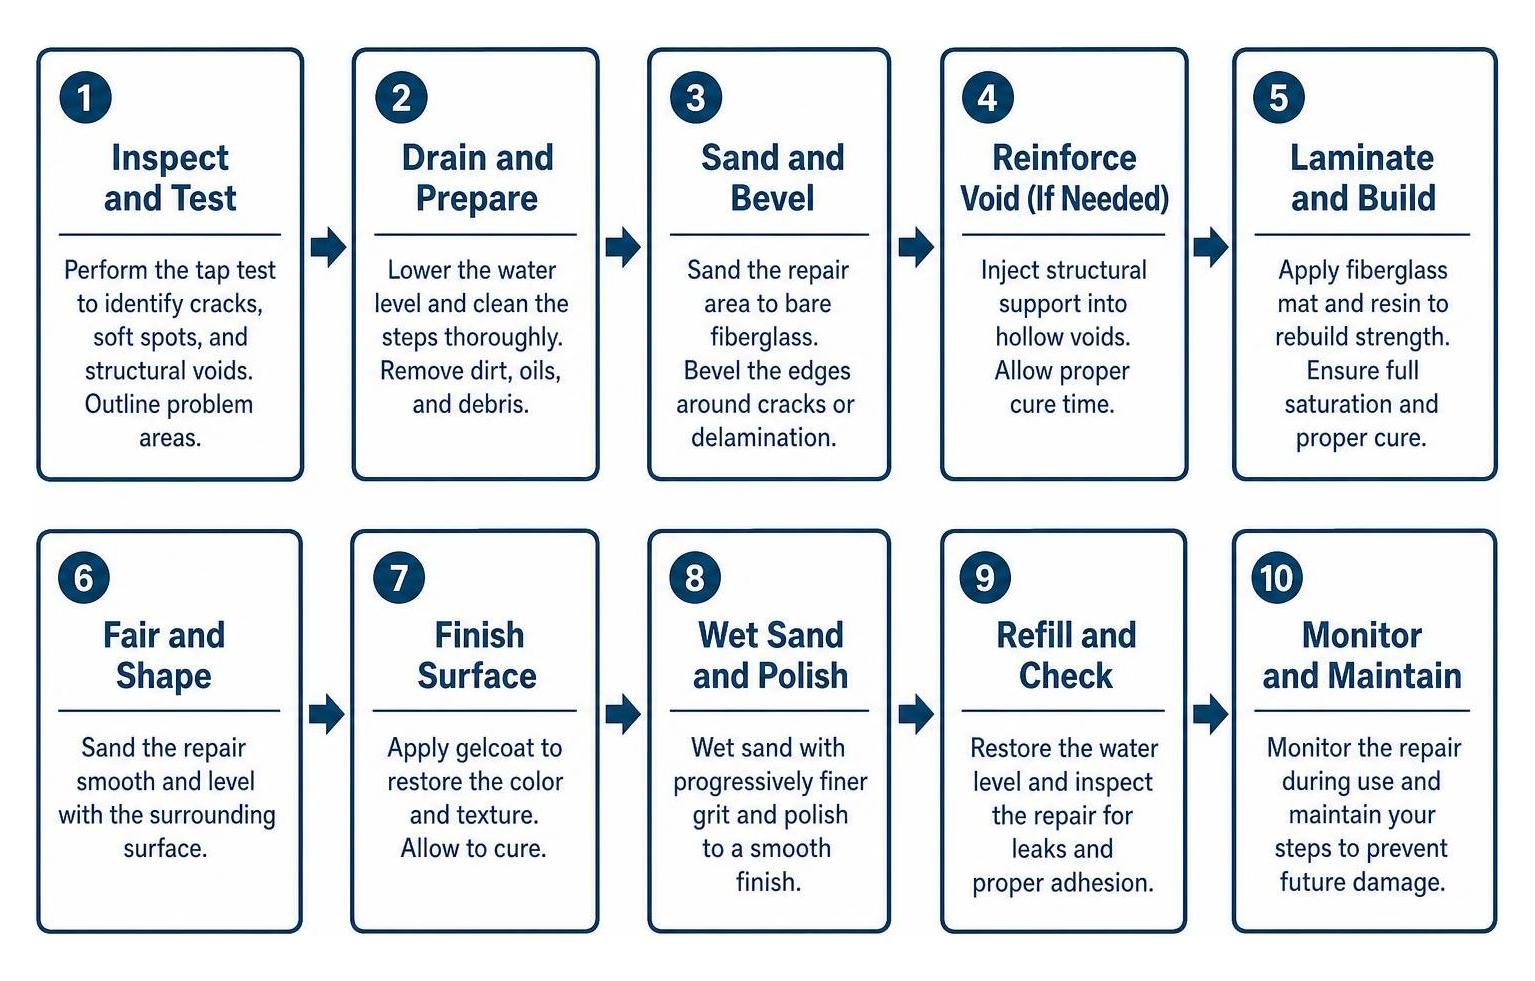
A permanent fix requires methodical preparation, mechanical sanding, structural lamination, and proper finishing. For detailed background techniques, you can review this permanent step repair steps resource alongside our steps below. If you run into complex structural damage, professional fiberglass pool repair is always an option.
Essential Tools for Swimming Pool Fiberglass Step Repair
Gather your safety gear, chemicals, and structural repair supplies before draining any water:
- Safety Gear: NIOSH-approved respirator rated for organic vapors, safety goggles, heavy chemical-resistant nitrile gloves, and disposable overalls.
- Surface Prep Tools: Rotary tool (Dremel) or angle grinder with sanding discs, 80-grit and 120-grit wet/dry sandpaper, sanding block, and microfiber rags.
- Cleaning Solvents: Pure acetone or 99% isopropyl alcohol (do not use household cleaners that leave oily residues).
- Lamination Materials: Marine-grade epoxy resin or vinyl ester resin with hardener/MEKP catalyst, chopped strand fiberglass mat (CSM) or woven fiberglass cloth, and graduated mixing cups.
- Application Tools: Fiberglass laminating roller, disposable stiff-bristle chip brushes, plastic squeegees, and mixing sticks.
- Finishing Supplies: UV-stabilized marine pool gelcoat, color pigments for matching, liquid wax/curing agent, and non-slip grit additive (polymer grit or micro-glass beads).
- Void Support (if needed): Two-part closed-cell high-density expanding polyurethane foam injection kit and 3/8-inch drill bits.
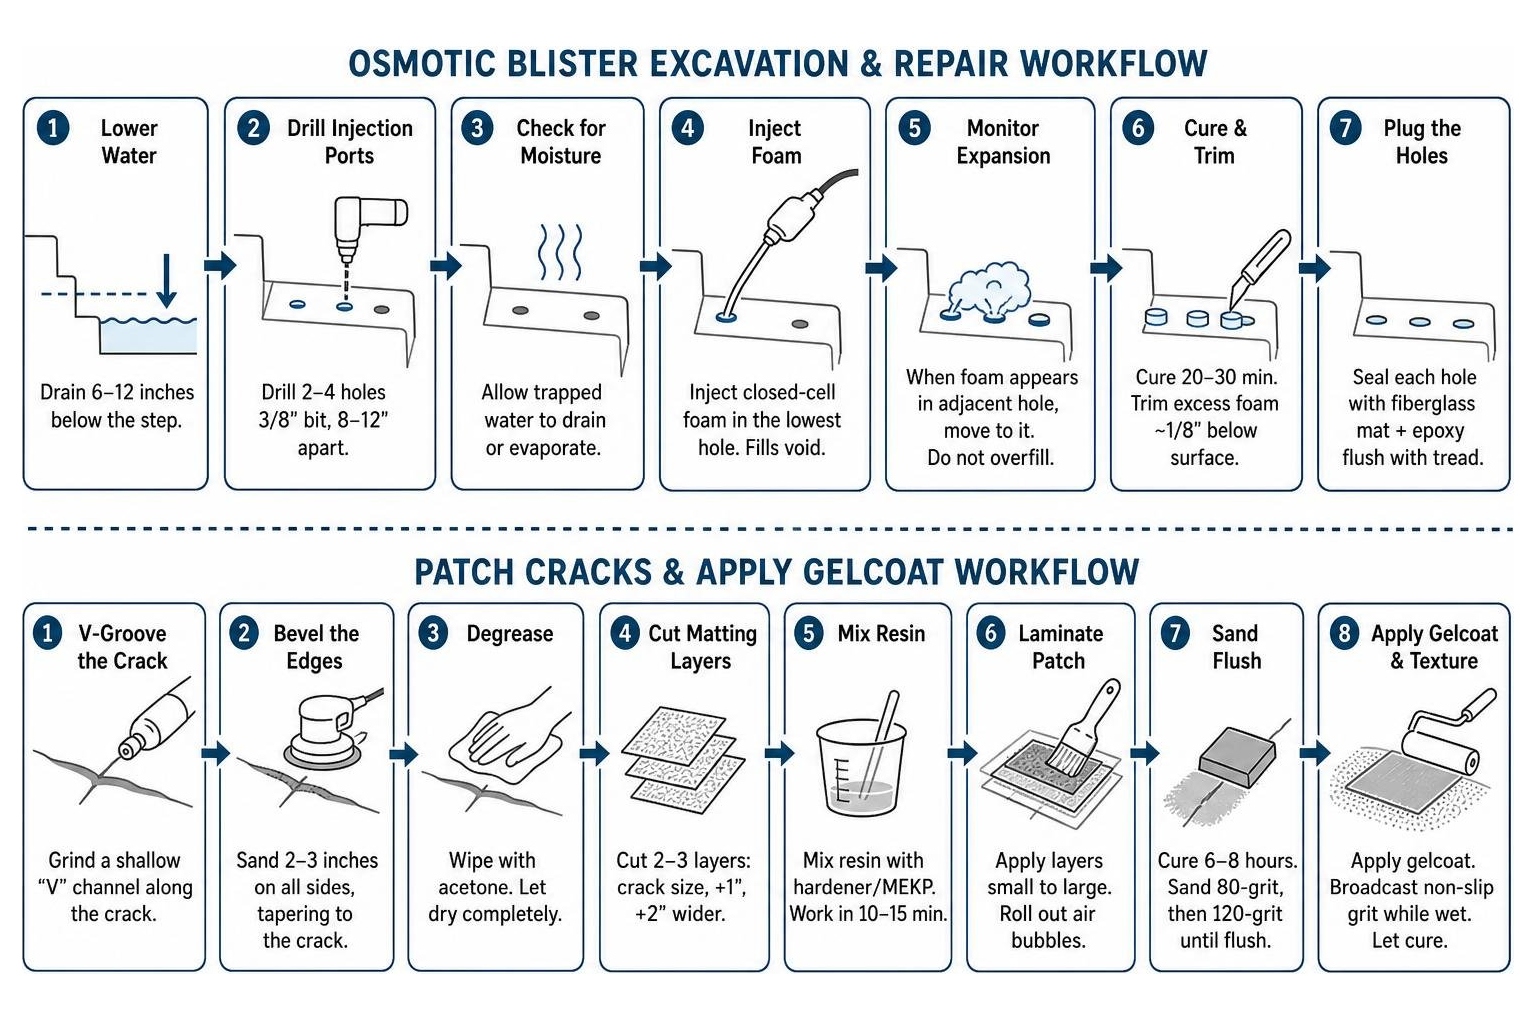
Stabilizing Voids with Expanding Foam
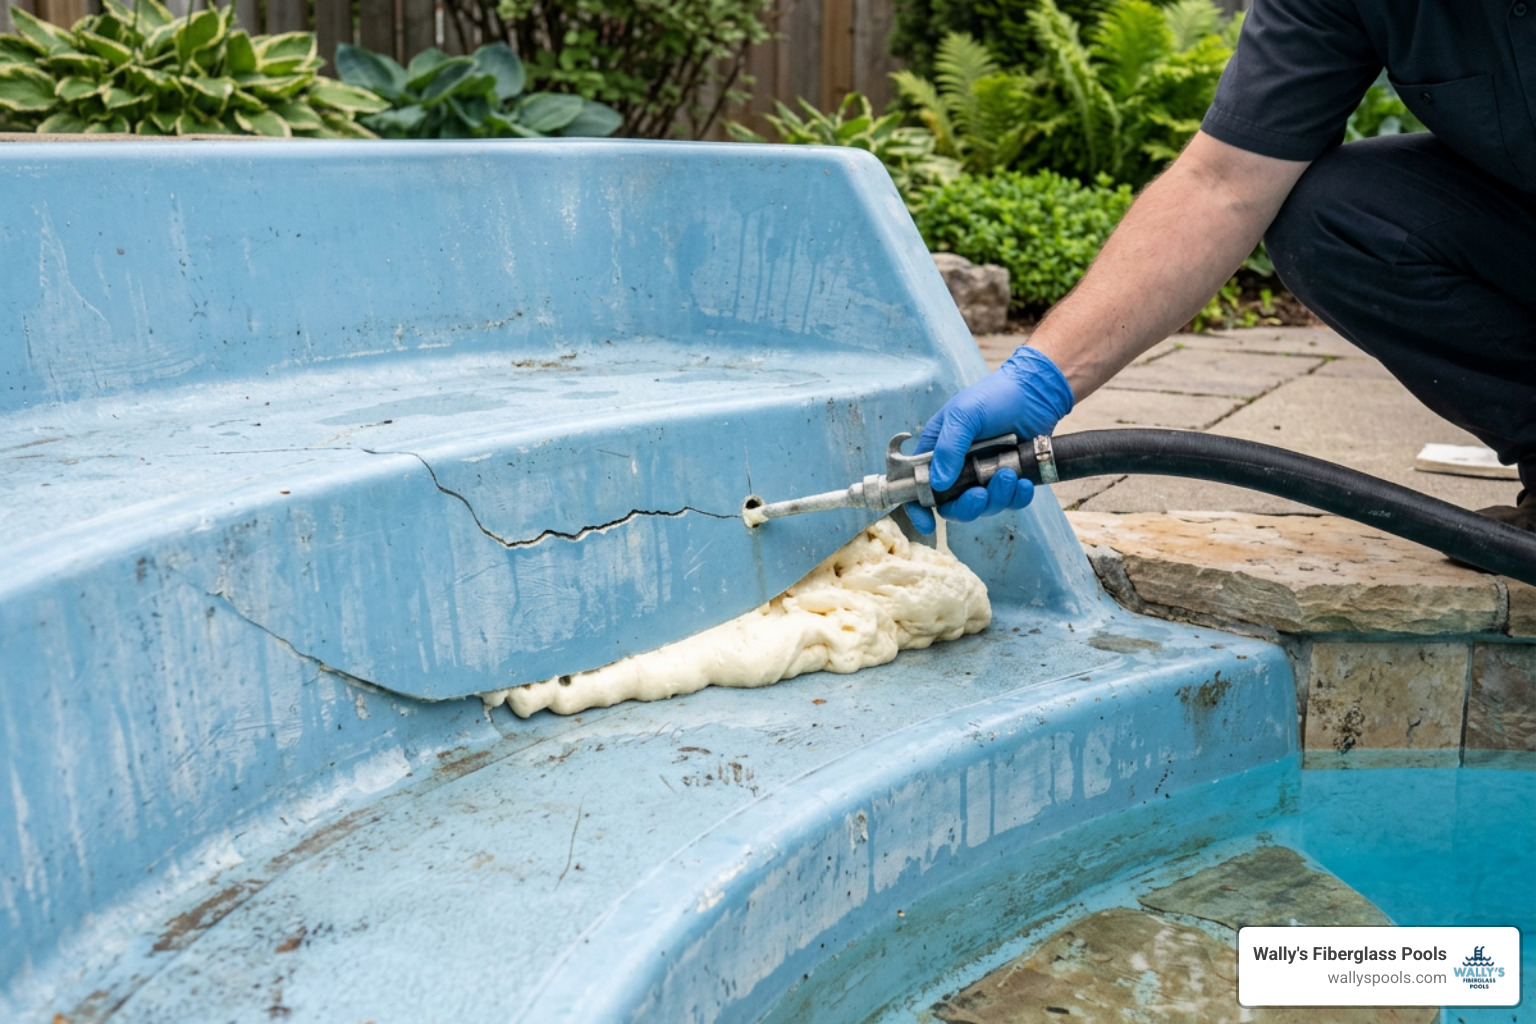
If your tap test revealed a hollow void under the step, you must stabilize the base before repairing the crack.
- Lower the Water: Drain the pool water at least 6 to 12 inches below the step you are repairing.
- Drill Injection Ports: Using a drill with a 3/8-inch bit, drill two to four access holes into the tread above the hollow area. Space them roughly 8 to 12 inches apart. Drill carefully through the fiberglass shell without boring deep into the dirt.
- Check for Moisture: Allow any standing water trapped under the step cavity to drain or evaporate.
- Inject Polyurethane Foam: Using a specialized closed-cell polyurethane pool foam kit (such as Secure Set or AquaBond PF-37), insert the mixing nozzle into the lowest hole. Inject the two-part foam steadily. High-density pool foams expand 15 to 25 times their original liquid volume to pack the void solidly.
- Monitor Expansion: Watch the adjacent holes. When you see foam start to emerge from an adjacent hole, stop injecting in the first port and move to the next. Do not overfill to the point where the expanding foam lifts or bulges the pool shell upward.
- Cure and Trim: Allow the foam to cure completely (typically 20 to 30 minutes). Once hardened, use a utility knife or rotary bit to cut the excess foam back roughly 1/8-inch below the surface of the hole.
- Plug the Holes: Seal each access hole with a small disc of fiberglass mat saturated with epoxy resin, bringing it flush with the tread.
Patching Cracks and Applying Gelcoat
With the base solid and supported, proceed with the structural patch:
- V-Groove the Crack: Using a rotary tool or triangular file, grind a shallow “V” channel along the entire length of the crack. This removes frayed fibers and provides a wider surface area for the new resin to grip.
- Bevel the Edges: Sand the gelcoat back at least 2 to 3 inches on all sides of the crack using 80-grit sandpaper, tapering (feathering) the edge down toward the crack channel.
- Degrease: Wipe the area clean using acetone and a lint-free rag to remove dust, wax, and oils. Let it dry completely.
- Cut Fiberglass Matting: Cut 2 to 3 layers of chopped strand mat. Cut the first piece to fit just over the crack, the second piece 1 inch wider on all sides, and the third piece 2 inches wider to step the patch smoothly into the existing laminate.
- Mix Resin: In a graduated cup, mix your marine epoxy or vinyl ester resin with the prescribed ratio of hardener or MEKP catalyst. Only mix what you can apply in 10 to 15 minutes.
- Laminate the Patch: Brush a thin layer of resin onto the prepared fiberglass. Lay down the smallest mat layer and stipple it with your brush until the white fibers turn completely translucent. Apply the second and third layers, using a fiberglass bubble roller to roll out any trapped air bubbles from the center outward.
- Sand Flush: Allow the patch to cure for 6 to 8 hours until rock-hard. Sand the cured patch with 80-grit, then 120-grit sandpaper until it sits perfectly flush with the surrounding step profile. Clean away dust with acetone.
- Apply Gelcoat with Non-Slip Texture: Mix your color-matched gelcoat with MEKP catalyst and add a wax additive (surfacing agent) so it cures tack-free in open air. Brush or roll the first thin coat over the patch. While the final coat is still wet, broadcast non-slip polymer grit over the tread surface for safety. Allow the gelcoat to cure completely.
Repairing Osmotic Blisters and Gelcoat Imperfections
Osmotic blisters—sometimes called pool acne—require a specific “decompression and dry-out” approach. If you simply paint gelcoat over a blister, trapped moisture and acid will push the new finish off within months. For a comprehensive look at osmotic chemistry, check out this guide on fixing osmotic blisters.
- Lower Water Level: Drop the water level below the blistered steps.
- Open the Blisters: Using a Dremel tool with a small grinding stone or carbide burr, grind open each blister dome. You will likely smell a strong, vinegar-like odor—this is acidic fluid produced by the osmotic reaction.
- Excavate Damaged Laminate: Grind out any soft, discolored, or blackened fiberglass underneath until you reach clean, dry, solid laminate.
- Flush and Neutralize: Wash the opened cavities thoroughly with clean water to flush out residual acids and chemical salts, then clean with acetone.
- Dry Completely: Allow the excavated cavities to dry thoroughly for 24 to 48 hours. Using a heat gun on low or a shop fan can speed this up. Never apply resin into a damp cavity.
- Fill with Structural Putty: Mix vinyl ester resin with a thickening agent (such as fumed silica/Cab-O-Sil) or use a marine structural epoxy putty. Press the putty firmly into the cavity using a plastic putty knife, slightly overfilling to allow for sanding.
- Sand and Topcoat: Once cured, sand the repaired spots flush with 120-grit sandpaper, wipe down with acetone, and coat with color-matched, UV-stabilized gelcoat.
Incorporating these checks into your standard pool maintenance routine keeps minor gelcoat blemishes from turning into large structural repairs.
DIY vs. Professional Repair: Costs and Considerations
Deciding whether to tackle step repairs yourself or bring in an experienced technician comes down to the extent of the damage, available tools, and budget.
| Repair Scope | DIY Cost | Professional Repair Cost | Full Step Assembly Replacement |
|---|---|---|---|
| Cosmetic Chips & Blisters | $75 – $150 (Resin, gelcoat kit, sandpaper) | $400 – $800 | N/A |
| Cracks with Hollow Void (Foam + Patch) | $250 – $450 (Foam kit, epoxy, matting, gelcoat) | $1,200 – $2,200 | $12,000 – $19,000 |
| Extensive Structural Delamination | Not Recommended | $2,000 – $3,500 | $12,000 – $19,000 |
A DIY repair using specialized closed-cell foam and marine lamination kits can save a homeowner roughly $800 to $1,500 compared to professional repair rates. Furthermore, repairing steps in-place avoids the massive expense of total stair replacement, which can climb between $12,000 and $19,000 when you factor in concrete deck removal, new step installation, and plumbing reconnections.
However, if your steps show signs of widespread delamination, large split seams along the pool walls, or severe settling that affects pool plumbing, calling licensed fiberglass pool contractors ensures the job is done with commercial-grade warranties and equipment.
Frequently Asked Questions About Step Repair
How long does a swimming pool fiberglass step repair take to cure before refilling?
A complete structural fiberglass repair and gelcoat application requires 24 to 48 hours of cure time before you can safely refill the pool. The exact time depends on ambient air temperature and humidity. Ideal curing occurs between 65°F and 85°F. Perform a simple “tack test” with a gloved finger on the gelcoat; if the surface feels completely hard, slick, and non-tacky, you can begin refilling the pool.
Can you fix cracked fiberglass steps without draining the pool?
While underwater epoxy sticks exist for emergency temporary seals, a permanent, structural repair cannot be done underwater. High-strength marine epoxy resins, fiberglass matting, and cosmetic gelcoats require a 100% dry, grease-free surface to bond mechanically and chemically. You must lower the water level at least 6 to 12 inches below the damaged area for a lasting repair.
Is epoxy resin or polyester resin better for pool step repairs?
Marine-grade epoxy resin and vinyl ester resin are far superior to standard polyester resin for repairing pool steps. While pool shells are originally manufactured using polyester resins in controlled factory molds, polyester has poor adhesive bonding properties when applied over old, cured fiberglass. Marine epoxy offers substantially higher tensile strength, superior water-immersion resistance, and the structural flexibility needed to withstand Wisconsin’s seasonal ground movement without cracking.
Conclusion
A cracked, hollow, or blistered pool step does not mean your swimming season is over or that you need an expensive pool overhaul. By catching damage early, testing for hollow voids, and using proper marine-grade epoxies, expanding foam, and UV-stabilized gelcoats, you can restore your pool stairs to pristine, safe condition.
Preventing step damage starts with smart winterization and balanced water chemistry. Make sure your pool water calcium hardness sits between 200–400 ppm and pH stays between 7.4–7.6 to prevent chemical degradation of your gelcoat.
If you encounter extensive cracking, suspect shifting soil under your pool shell, or prefer to have seasoned professionals handle the job, reach out to the local team at Wally’s Fiberglass Pools. We specialize in helping homeowners across Sussex, Lake Country, Waukesha County, and Southeast Wisconsin keep their backyard investments strong, safe, and beautiful for decades to come.